Like an undersized fish, I’m about to throw you back! In years past, there wasn’t nearly the level of technology as today to explore the ocean. But, that doesn’t mean ingenious and innovative people weren’t constantly finding ways to answer questions. And a lot of this equipment is still used today! It’s brilliant, it’s simple, it’s relatively affordable, and the standard use of this equipment across the world and across fields of research allows for the collection of lots of useful and comparable data. There are a lot of great pieces of equipment but these are a few of my favorites.
Water Quality

First, it’s always important to know some things about the water itself. Because I love the equipment for these, I’ll focus on temperature, salinity, and clarity/color. All of these factors are important indicators of the health of a given system as well as in determining what organisms can live in it. Although there are lots of fancy instruments for collecting these pieces of information, there are some classics as well. For example, to measure temperature, all you need is a thermometer! If you’re interested in measuring the temperature at the surface of the water, you can use any standard thermometer. And if you’re interested in shallow depths, you can attach said thermometer to a string to drop it down. To measure temperature at greater depths, an instrument called a bathythermograph was developed beginning in 1935. It was a torpedo shaped item that included a temperature sensor and transducer. It made recordings of temperature and pressure at various depths on a coated glass slide. When it reached its maximum depth (~935 ft, 235 m), it was reeled back up to the surface where the data could be read. It would give you a temperature profile of the water column since pressure could be used to calculate depth.

To determine salinity, hydrometers have long been the standard. The earliest hydrometer was likely developed by Greek scholar Hypatia of Alexandria in the 4th or 5th century (this tech is really old school!). Hydrometers take advantage of the principles of density and floatation. The more salts in water, the heavier and denser it is. A hydrometer generally is made of glass, has a stem and a bulb and is filled with a small amount of mercury or lead. When it is lowered gently into a given fluid, it will float at a different level based on the density of the fluid. The saltier the seawater, the higher the hydrometer will float. Ever notice you float easier in salt water than in freshwater? Same principles apply! There is a scale on the stem from which a person can read the density. Then, because the physical relationship between temperature, salinity, and density is known, salinity can be found on a TSD graph.

And now to introduce my favorite water quality instrument: the secchi disk. This iconic disk has been modified throughout its history (starting in 1865) from a plain white disk to one with alternating quarters of black and white. Both styles are still used. The secchi disk is used to assess water clarity and color. The disk is attached to a rope, weighted, and lowered into the water until the observer can no longer see it. They note that depth and the depth at which it reappears. Based on the average of those depths, called the secchi depth, water clarity can be assessed. Again, there are some limitations based on amount of light available as well as variation in individual observers’ eyesight, but these measures can be very useful in comparing water clarity between locations. The secchi disk can also be used to assess water color. The disk is lowered to a depth of ~1 meter, then the color of the water between the surface and the white portion of the disk is classified based on the Forel-Ule scale. Again, there will be some variation in how individuals classify those colors, but it is still a useful tool for looking at water color in a simple, low budget way.
Finally, sometimes you want to collect and analyze water from a particular depth, but how do you do that? Well, the answer is a Van Dorn sampler! This ingenious contraption invented in 1956 consists of an open-ended cylinder attached to a rope or line. It is lowered into the water to the desired sample depth. Once there, a weight is sent down the line where it hits a release mechanism at which point water-tight caps seal on the ends of the cylinder (video!). These caps generally have spigots in them now. The sampler is brought up to the surface or boat deck and any sample bottles are filled from the spigots. Then the water can be tested on site or shipped in bottles to a lab to be analyzed. It’s an amazing contraption that allows us to collect information from specific depths. Conditions are not the same throughout the water column.
Habitats and Inhabitants

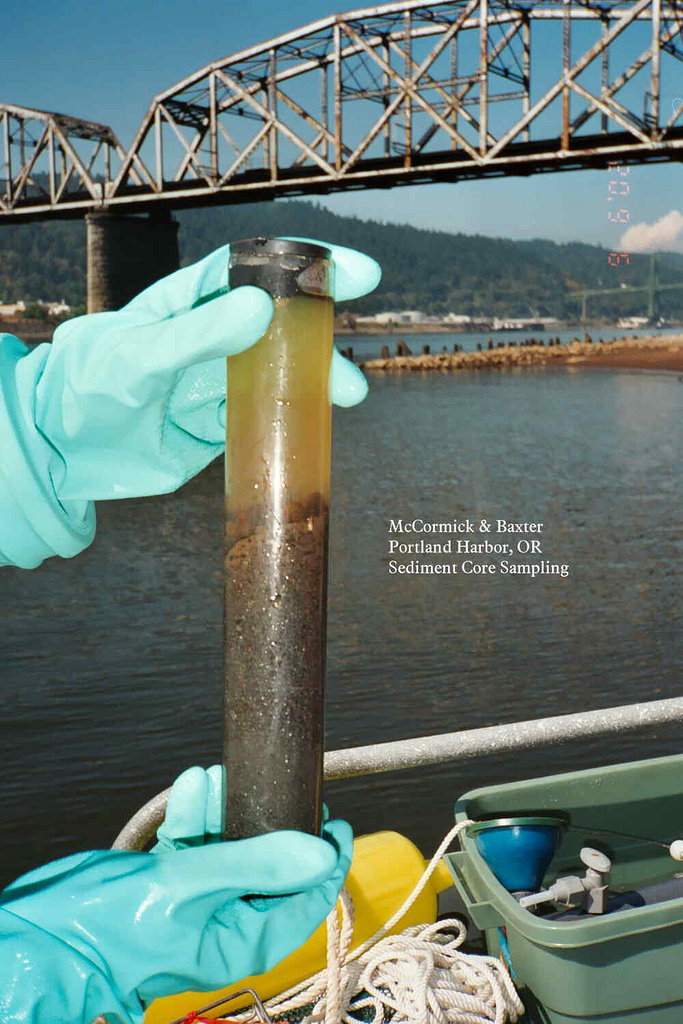
Once you know about the water, it’s time to figure out what lives in or below it! What type of habitats are present and what are they like? The bottom is also very important so it’s generally useful to know about the sediment profile and what lives (or historically lived) in it. To collect that data, cores are collected. Since the newest sediment is on top, by driving a tube straight downward into the sediment, pulling it up, capping the end and later gently extracting the core, researchers can look into the sediment history as deep as the core goes. They can assess the different pollens present and construct plant history, they can look at what critters live in the soil and provide food for bottom feeders, and they can look at what types of sediment have been deposited throughout time.

Assessing habitats also requires assessing distances and abundances of various plant and animal life to name a few. Like on land, to measure extents or distances, we often use transect tapes. But these tapes can be used for more than just measuring. Once a transect is laid out, various methods can be used to assess the habitat underneath it. One of the most common is the point-intercept method. To illustrate how this works, let’s say your transect is 30 m long and you want to characterize what it spans. You decide to look at what lies underneath each quarter meter along the transect. Is it hardbottom? Seagrass? Sand? You put tally marks in each category as you look at each point and then at the end you can calculate a percent cover of each type of bottom habitat. I personally used this method for assessing percent cover in coral reef habitats. Another way to determine abundance or distribution, such as that of a particular species, is to use a quadrat. Most quadrats are square and constructed from PVC. Most are subdivided into smaller squares with taut string. A point-intercept approach can be used looking at each intersection of strings. For example, I’ve used that method on oyster reefs to record what percent of the cover is live oyster versus dead shell. They can also be used for assessing percent cover in other ways, such as counting the number of squares in which a species is present or visually determining a range of squares a species of seagrass would fill if the shoots were clustered together (the Braun-Blanquet method).

Finally, to catch and count creatures, researchers often use nets—each specially designed for its purpose. There are bottom-trawling nets designed to capture creatures that live on the benthos. For small organisms that dwell in the sediment, grab samplers are sometimes utilized. They look like clawed contraptions, but they do exactly what they are named for: they grab sediment and whatever is in it and bring it to the surface for sorting and analysis. There are plankton nets that are towed through the water, funneling plankton into a bottle at the bottom for later analysis. These tows are standardized by how long they are dragged or by how much distance is covered as well as the size of the gear. Seine nets and dip nets are used as well as fishing gear of all types depending on the species whose population and or health is to be assessed. Once fish are caught in these nets, they are quickly sorted by species and counted to assess the population density and if performed multiple times across habitats and areas to determine patterns of distribution.
Of course, these types of equipment have limitations and many have been improved upon throughout history. But, their simplicity make them invaluable to the field. I didn’t even touch upon the history of vessels, SCUBA diving, submarines, etc., but we should all give a shout out to the brilliant engineers and scientists who came before us and made ocean exploration possible! They gave us the instruments that we use daily to answer our questions!
You Tell Me: What are your favorite simple sampling gears?
If you find yourself interested in learning to use this equipment or become involved in using it, many areas have volunteer programs for monitoring water quality (freshwater and marine), habitats, and particular organisms! Reach out and ask about getting involved!
An interesting source: http://www.marinebio.net/marinescience/01intro/
I am a graduate of the University of Notre Dame (B.S.) and the University of Rhode Island (M.S.). I now work in southwest Florida, contributing to the management of an estuary. I am fascinated by the wonders of nature, the land-sea interface, ecology and human disturbance (and solutions!). On a personal level, I am a chocoholic, love to travel and be outside, and relax by reading or spending time with my emotionally needy dogs!
Love this article, especially the part about seining. For more than half a century I have dragged small sines through estuaries, and still get a kick out of it. There are few better ways to begin to teach children the value of that particular environment than to spend a few hours getting mud between their toes and sand in their shoes, hauling in and identifying critters in a bed of eelgrass. And maybe none as inexpensive and fun as well.
Hi Wayne! Thanks so much for the comment! I agree whole-heartedly and am glad you’ve had the experience of seining! Ever thought of keeping track of what you find in your seines as part of citizen science project? There may be opportunities to do so. And for anyone who has never gone wading into the shallows of an estuary or just off a beach, put it on your bucket list! It’s always cool to see what you might find.